- Posts: 1755
- Thank you received: 1832
A was for Austin, but now B is for Bedford
2 years 8 months ago - 2 years 8 months ago #224349
by PDU
Replied by PDU on topic A was for Austin, but now B is for Bedford
Hate to disappoint you Zuffen but they would be in their seventies by now. :ohmy:
Thanks for the tips cobbadog, the pulleys are critical, as you say, but they will not be placed until after screwing down the horizontal bits and assessing the cables that run across to the passenger's side. On the driver's side, the one nearest the cab has no option but to remain at its existing length (the shortest cable), while the one to the rear will need to be lengthened because the two spring holders are now wider apart than they were originally. I am hoping that by careful placement of the pulleys behind the cab I will be able to retain one of the existing cables for the other side also. If I aim for the longer one the other can be shortened to suit the new placement. End result: Only one cable will need to be changed (optimistic PDU).")
Thanks for the tips cobbadog, the pulleys are critical, as you say, but they will not be placed until after screwing down the horizontal bits and assessing the cables that run across to the passenger's side. On the driver's side, the one nearest the cab has no option but to remain at its existing length (the shortest cable), while the one to the rear will need to be lengthened because the two spring holders are now wider apart than they were originally. I am hoping that by careful placement of the pulleys behind the cab I will be able to retain one of the existing cables for the other side also. If I aim for the longer one the other can be shortened to suit the new placement. End result: Only one cable will need to be changed (optimistic PDU).
Last edit: 2 years 8 months ago by PDU.
Please Log in to join the conversation.
2 years 8 months ago #224368
by PDU
Replied by PDU on topic A was for Austin, but now B is for Bedford
Okay, enough of the females please - let's get back to the trucks! ")
Please Log in to join the conversation.
2 years 8 months ago #224374
by PDU
Replied by PDU on topic A was for Austin, but now B is for Bedford
No comment, other than two nice examples of early Ford F1's
NO MORE!
NO MORE!
Please Log in to join the conversation.
2 years 8 months ago #224395
by PDU
Replied by PDU on topic A was for Austin, but now B is for Bedford
Oh, much more impressive, and without any additional bystanders. I assume the nameless Queenslander, Mr(?) Aussie Truckin obliged me by removing the last bit of excessive ornamentation?  If so thankyou.
 ")
Even better, I applaud your selection of K, M, and O type Bedfords, in order too. :ohmy: In particular the last (albeit early English bodied) Bedford - which is similar to my planned version in three areas, but which I will not expand on at this point of time.
If so thankyou. Even better, I applaud your selection of K, M, and O type Bedfords, in order too. :ohmy: In particular the last (albeit early English bodied) Bedford - which is similar to my planned version in three areas, but which I will not expand on at this point of time.
Please Log in to join the conversation.
2 years 7 months ago - 2 years 7 months ago #224723
by PDU
Replied by PDU on topic A was for Austin, but now B is for Bedford
At last, on Friday Ernie returned to tackle some of the welding jobs that have been on hold. First job was to weld around the inner wheel arch supports . . .
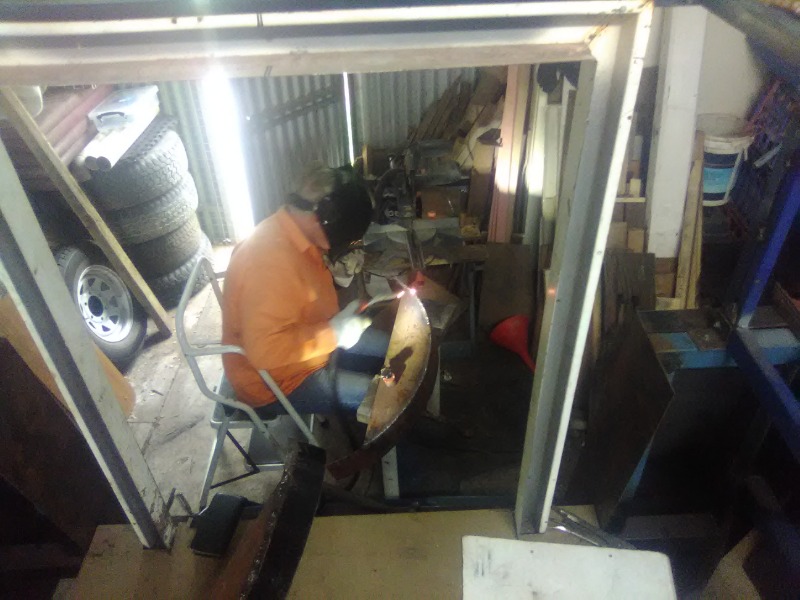
. . . and you can see he does enjoy what he's doing.
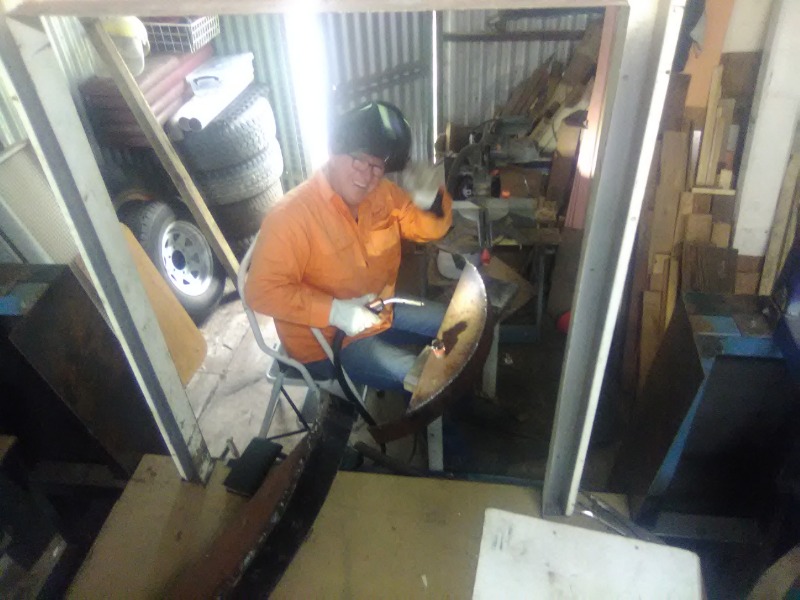
These were actually welded on one side and then left for a while as we moved on to the next job. When completed I will need to remove both rear wheels on each side to get them back in. Not looking forward to that, or lining things up, or putting all the screws back in.
The next job was the lift up roof, which was constructed without the three crossbeams, so just a large rectangular framework. Until I can wind it up and down the crossbeams will be left out, otherwise I'll have to keep ducking under them when moving around on the tray.
With the frame nicely welded Ernie moved back onto the wheel arches while I ground the corners smooth and manoeuvred it up onto the tray. This then allowed me to set the two uppermost frame rails (one either side of the lift up roof) and to ensure there was sufficient clearance for the roof between them. This all went with out a hitch thanks to the four extra plates I had Ernie also tack-weld to the framework; these prevented the roof from simply falling through between the two uppermost frame rails which were subsequently welded into place.
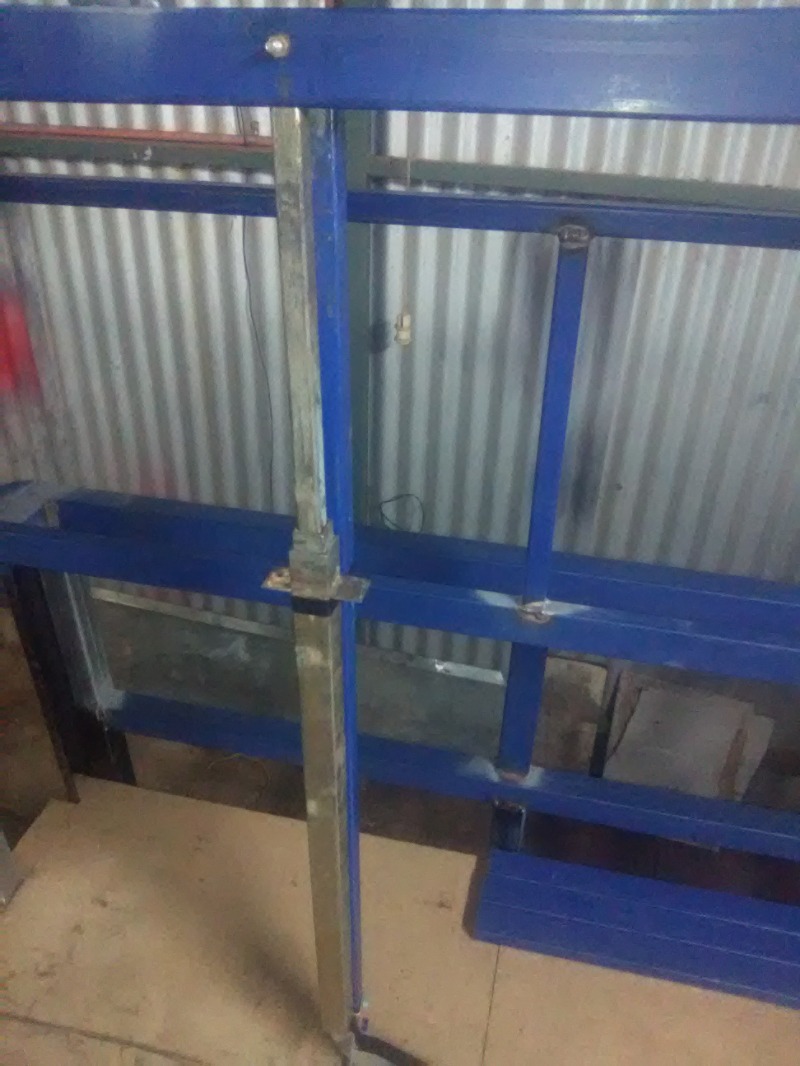
Next the support posts for the lifting tubes were welded to the uppermost frame rails and Ernie returned to the wheel arches.
Two cups of tea/coffee and nibbles thrown in and that accounted for three hours, after which I was working solo again as Ernie had some trees to go and prune. Or at least I would have been working solo if one of my grand-daughters had not turned up to visit and spend the night with us. Pest! But at least she does visit and we do play eight ball together . . .
Saturday, I was up and raring to go with the lift up mechanisms - a quiet job only needing the posts and other bits to be aligned and screwed to the floor.
Rather than remove the cables and rethread them through the various pulleys, I flipped the whole lot from one side to the other - putting the winch on the LHS now. With this done I was able to use two of the pulleys to run the cables across the front of the tray and then through a third pulley that I reversed so the cables were redirected where they needed to go. No doubt clear as mud without a piccie?
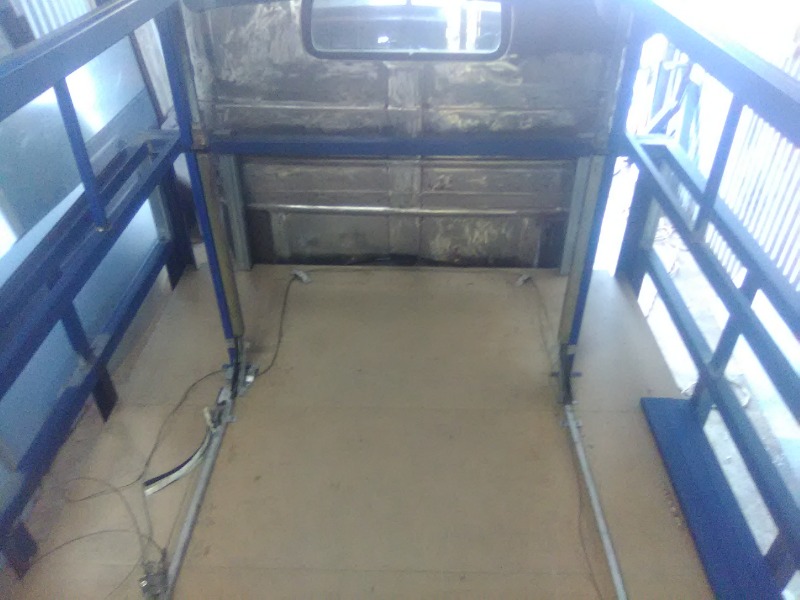
With everything tied down (albeit with the lifting mechanisms only taped in place to the support tubes) I was able to position and mark the lift up roof frame where the whole she-bang would slot together. Once marked, the roof frame was again removed, turned over so I could cut out the four square holes where the lifting tubes were going to fit into. Then, back up onto the truck once again, phew.
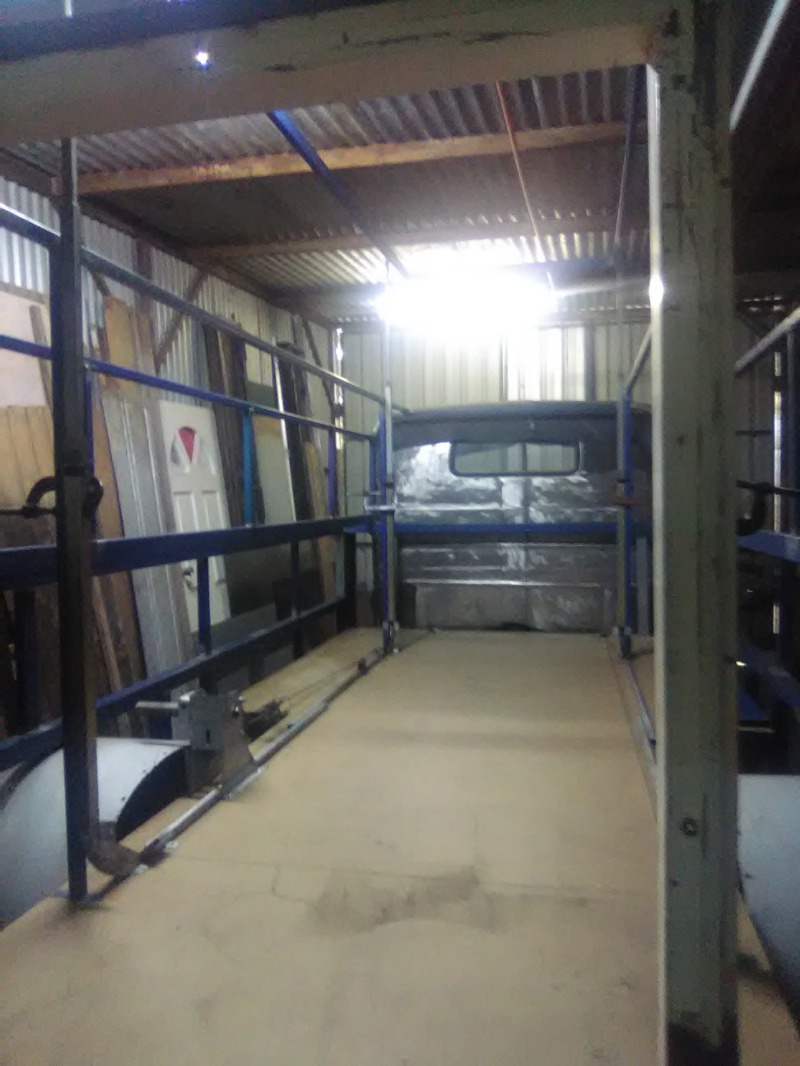
Before going any further I was informed by wife she was taking grand-daughter out for a drive. I decided to check how high the cables would pull the lifting tubes up. I lifted one leg up to about six foot three inches, with plenty left to go - with all the cables fixed and correctly adjusted to lift together the roof will go up the same amount. :woohoo:
Finally I fitted the roof back in place so I could drill the holes to attach roof and tubes together.
More was done, Saturday afternoon, but this bit has been long enough already. As a sidenote here, 6;15 I decided to check where wife had got to . . . Adelaide, 200km away! So a quiet night for me. :huh:
With Sunday being my lay in bed day (listening to Macca), and also when I cater to the dogs needs sort of day the truck will have to wait until Monday for the next bit of action.
. . . and you can see he does enjoy what he's doing.
These were actually welded on one side and then left for a while as we moved on to the next job. When completed I will need to remove both rear wheels on each side to get them back in. Not looking forward to that, or lining things up, or putting all the screws back in.
The next job was the lift up roof, which was constructed without the three crossbeams, so just a large rectangular framework. Until I can wind it up and down the crossbeams will be left out, otherwise I'll have to keep ducking under them when moving around on the tray.
With the frame nicely welded Ernie moved back onto the wheel arches while I ground the corners smooth and manoeuvred it up onto the tray. This then allowed me to set the two uppermost frame rails (one either side of the lift up roof) and to ensure there was sufficient clearance for the roof between them. This all went with out a hitch thanks to the four extra plates I had Ernie also tack-weld to the framework; these prevented the roof from simply falling through between the two uppermost frame rails which were subsequently welded into place.
Next the support posts for the lifting tubes were welded to the uppermost frame rails and Ernie returned to the wheel arches.
Two cups of tea/coffee and nibbles thrown in and that accounted for three hours, after which I was working solo again as Ernie had some trees to go and prune. Or at least I would have been working solo if one of my grand-daughters had not turned up to visit and spend the night with us. Pest! But at least she does visit and we do play eight ball together . . .
Saturday, I was up and raring to go with the lift up mechanisms - a quiet job only needing the posts and other bits to be aligned and screwed to the floor.
Rather than remove the cables and rethread them through the various pulleys, I flipped the whole lot from one side to the other - putting the winch on the LHS now. With this done I was able to use two of the pulleys to run the cables across the front of the tray and then through a third pulley that I reversed so the cables were redirected where they needed to go. No doubt clear as mud without a piccie?
With everything tied down (albeit with the lifting mechanisms only taped in place to the support tubes) I was able to position and mark the lift up roof frame where the whole she-bang would slot together. Once marked, the roof frame was again removed, turned over so I could cut out the four square holes where the lifting tubes were going to fit into. Then, back up onto the truck once again, phew.
Before going any further I was informed by wife she was taking grand-daughter out for a drive. I decided to check how high the cables would pull the lifting tubes up. I lifted one leg up to about six foot three inches, with plenty left to go - with all the cables fixed and correctly adjusted to lift together the roof will go up the same amount. :woohoo:
Finally I fitted the roof back in place so I could drill the holes to attach roof and tubes together.
More was done, Saturday afternoon, but this bit has been long enough already. As a sidenote here, 6;15 I decided to check where wife had got to . . . Adelaide, 200km away! So a quiet night for me. :huh:
With Sunday being my lay in bed day (listening to Macca), and also when I cater to the dogs needs sort of day the truck will have to wait until Monday for the next bit of action.
Last edit: 2 years 7 months ago by PDU.
Please Log in to join the conversation.
Less
More
- Posts: 6816
- Thank you received: 4697
2 years 7 months ago #224726
by Mrsmackpaul
Your better to die trying than live on your knees begging
Replied by Mrsmackpaul on topic A was for Austin, but now B is for Bedford
Looking good to me, but I have no idea what Im actually looking at so this might mean absolutely nothing at all :huh: :huh: :huh:
I am intrigued by this whole operation and enjoy the up dates
Paul
I am intrigued by this whole operation and enjoy the up dates
Paul
Your better to die trying than live on your knees begging
Please Log in to join the conversation.
2 years 7 months ago #224741
by cobbadog
Cheers Cobba & Cobbarette
Coopernook, The Centre of our Universe
Working on more play time.
Replied by cobbadog on topic A was for Austin, but now B is for Bedford
It should always put a smile on your dial when making something different and it shows in Ernies smile.
As tricky as the lifting mechanism sounds, once in place and aligned it is such a simple way of lifting heavy roofs like in this situation. I am sure a couple of clear pics once installed and trialled it will be easily understood.
PDU you must be pleased with the progress again. Did wife and grand daughter come back?
Cheers Cobba & Cobbarette
Coopernook, The Centre of our Universe
Working on more play time.
Please Log in to join the conversation.
2 years 7 months ago #224743
by PDU
Replied by PDU on topic A was for Austin, but now B is for Bedford
Mrsmackpaul: I appreciate the whole thing sounds confusing, and is difficult trying to explain it, but as cobbadog says, "a couple of clear pics once installed and trialled it will be easily understood" hopefully.
Ernie's smile was repeated when he saw your comment cobbadog - actually checking out my post as he wanted to see what 'his' pictures looked like when your post came through! :ohmy:
I might add he was here for a fifteen minute welding job, which has saved me having to make up a new "longer" cable for the fourth leg. All will be explained (with pictures) in my next post.
The following user(s) said Thank You: cobbadog
Please Log in to join the conversation.
2 years 7 months ago - 2 years 7 months ago #224744
by PDU
Replied by PDU on topic A was for Austin, but now B is for Bedford
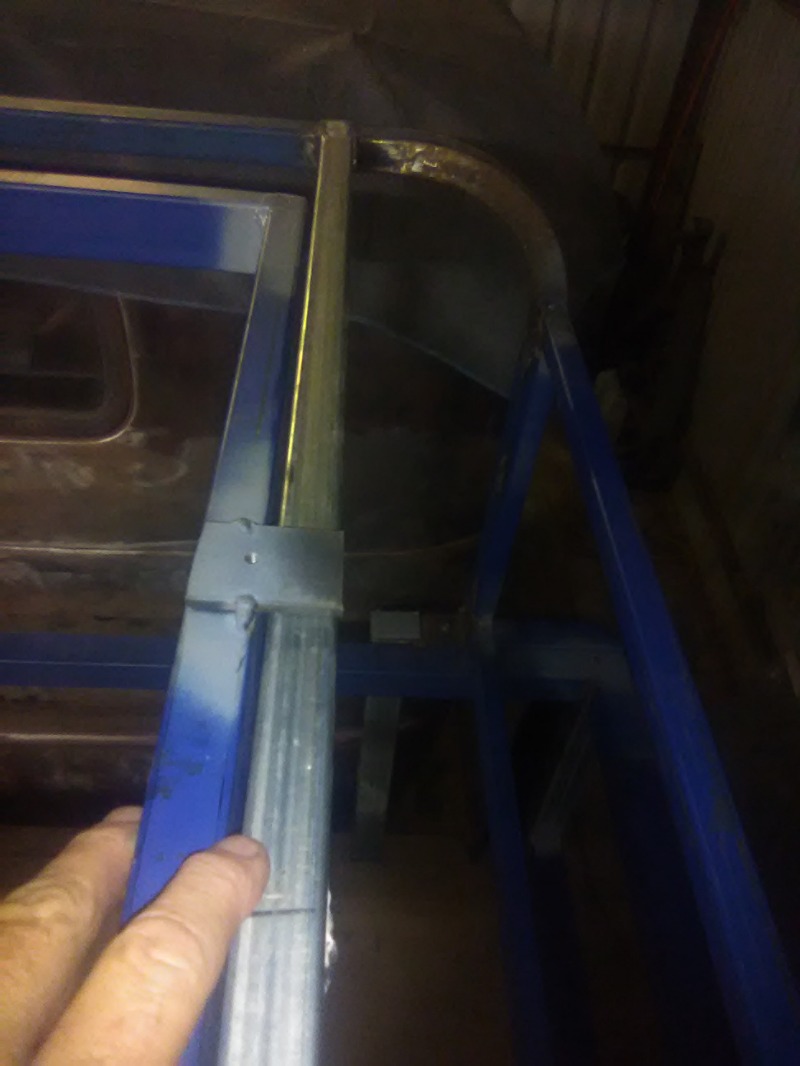
Rather than make a new (longer) cable I figured that all that was needed was to move a pulley backwards by about 25cm from this position . . .
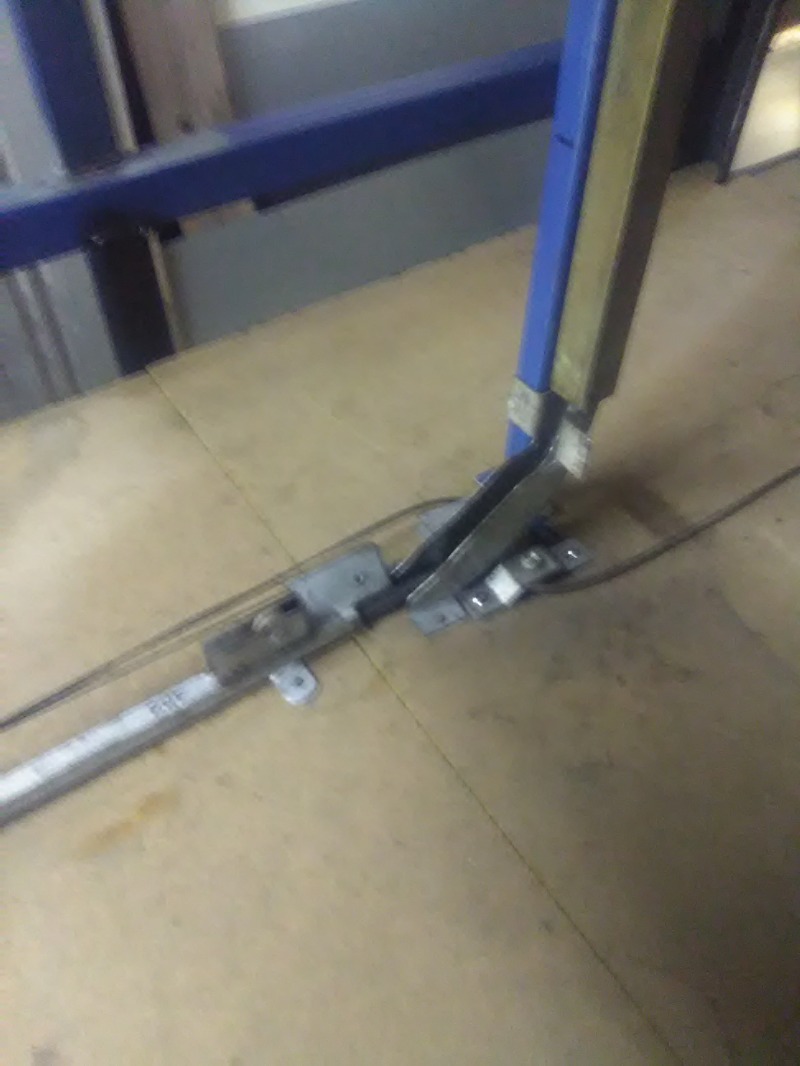
. . . to this position . . .

. . . which accompanied by shortening the two RHS cables, and adjusting them all to lift at the same time, managed to raise the roof to six foot plus.
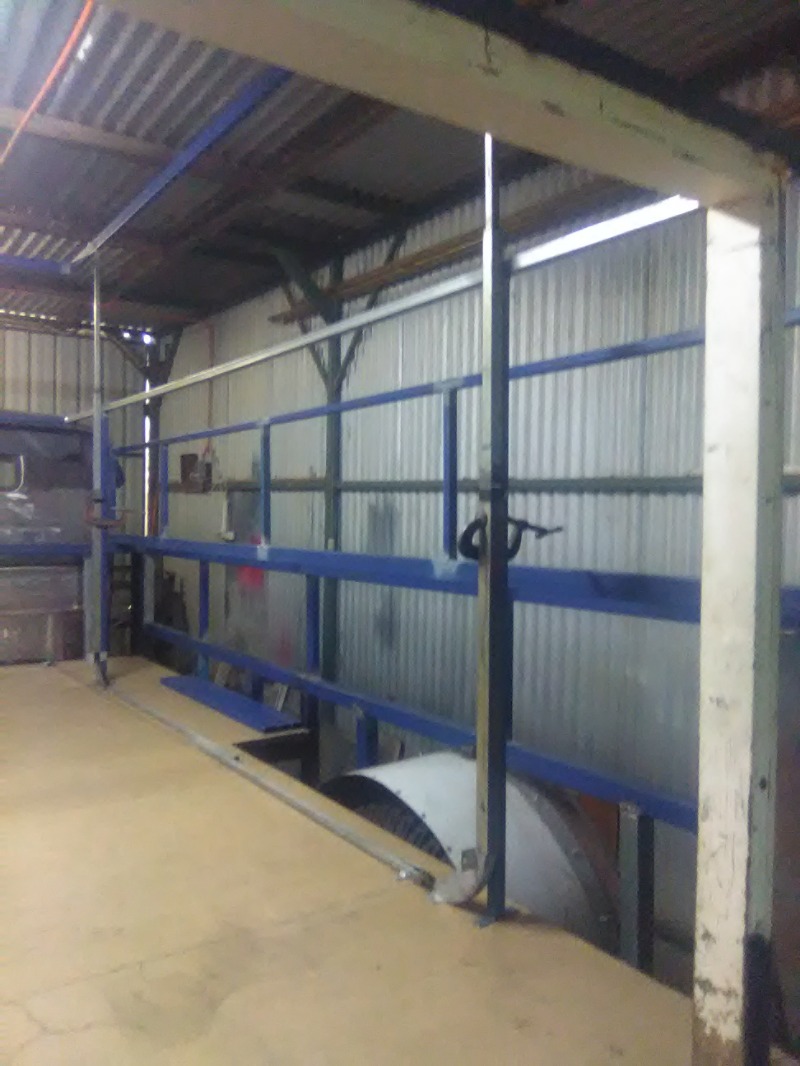
It could have gone higher, but with barely two inches clearance to the fluros above I was satisfied with the first lift.
There are still some areas that need to be addressed with the lifting tubes but all in alll a satisfactory result for now.
. . . to this position . . .
. . . which accompanied by shortening the two RHS cables, and adjusting them all to lift at the same time, managed to raise the roof to six foot plus.
It could have gone higher, but with barely two inches clearance to the fluros above I was satisfied with the first lift.
There are still some areas that need to be addressed with the lifting tubes but all in alll a satisfactory result for now.
Last edit: 2 years 7 months ago by PDU.
Please Log in to join the conversation.
2 years 7 months ago #224751
by Zuffen
Replied by Zuffen on topic A was for Austin, but now B is for Bedford
What do you plan on using to fill in the sides once lifted.
Looking good.
My Dad used to fit elevating roofs to all sorts of vehicles back in the 60/70's
Looking good.
My Dad used to fit elevating roofs to all sorts of vehicles back in the 60/70's
Please Log in to join the conversation.
Time to create page: 0.618 seconds