- Posts: 196
- Thank you received: 0
Desperately needing Inter 282 engine specs
13 years 6 months ago #35902
by cobba
Desperately needing Inter 282 engine specs was created by cobba
I am getting pretty close to putting my engine back together after a full rebuild. Should have it back here tomorrow or the day after with a bit of luck.
I am after all the specs on it that I can get. Stuff like head bolt tension and order, that sort of stuff.
Is there a particular way that the oil pump has to be inserted, I mean like does it have to be timed to the cam so the dizzy is starting at the correct spot.
Bit hard to explain but the gear is on the oil pump on these, not the dizzy so I am wondering does it matter or not where it lines up.
Any info would be appreciated cos I ain't been able to find a workshop manual after 5 months of looking.
Willing to buy a book ifn you know where one is, but I need it ASAP.
Cheers. Cobba.
Please Log in to join the conversation.
13 years 6 months ago #35903
by Acco1810B
Replied by Acco1810B on topic Re: Desperately needing Inter 282 engine specs
i have a workshop manual here with the 6-281 and the 6-282 specs. " service manual for Carbureted engines ( 6-281,6-282,V304E.V345 and V392. I will look for what you want and copy it out for you tomorrow. RIght now i am off to night shift . Joy oh Joy . hahahaha .
Please Log in to join the conversation.
13 years 6 months ago #35904
by cobba
Replied by cobba on topic Re: Desperately needing Inter 282 engine specs
Thanks Acco. Much appreiciated.
Please Log in to join the conversation.
13 years 6 months ago - 13 years 6 months ago #35905
by
Replied by on topic Re: Desperately needing Inter 282 engine specs
Are the specs different between the 6-282, and the AGD-282? Or are they all the same, and it's just the same engine re-named? .. 
I have an AB series manual, which contains all the engine overhaul info and specs (incl the AGD-282) .. and I have a D-series manual .. but that manual contains no engine o/haul info .. it was put in a separate book when the D-series was built ..
I have an AB series manual, which contains all the engine overhaul info and specs (incl the AGD-282) .. and I have a D-series manual .. but that manual contains no engine o/haul info .. it was put in a separate book when the D-series was built ..
Please Log in to join the conversation.
13 years 6 months ago - 13 years 6 months ago #35906
by cobba
Replied by cobba on topic Re: Desperately needing Inter 282 engine specs
I honestly can't answer that one track, but I personally don't think there have been too many changes in any of the Inter 6s over the previous 10 years since the 240 or 264 engine other than going to the tilt valve head.
I picked up an operators manual to suit a D line 1300 1800 series at the Jindera swap meet on Sunday.
It tells me how to do the timing and tune a carby but nothing to do with re assembling an engine.
I picked up an operators manual to suit a D line 1300 1800 series at the Jindera swap meet on Sunday.
It tells me how to do the timing and tune a carby but nothing to do with re assembling an engine.
Last edit: 13 years 6 months ago by cobba.
Please Log in to join the conversation.
13 years 6 months ago #35907
by podge66
Replied by podge66 on topic Re: Desperately needing Inter 282 engine specs
Cobba, Main bearings 90-95 ft lb, Big ends 40-45 ft lb, Head bolts 90-95 ft lb starting in middle and working round in circle, pull head up in 3 stages 50.70 90. Timing Dot to Dot. oil pump just fit it. Make sure rear main is fitted proply and push nearly all the rope in back hole tight or you have big leaks. Tappets 025 " Good luck and good building. Podge. ")
Please Log in to join the conversation.
Less
More
- Posts: 1025
- Thank you received: 1
13 years 6 months ago #35908
by kennymopar2
Replied by kennymopar2 on topic Re: Desperately needing Inter 282 engine specs
from memory soak the rope rear main seal in engine oil for a day or two before fitting
Please Log in to join the conversation.
13 years 6 months ago #35909
by paul404
Replied by paul404 on topic Re: Desperately needing Inter 282 engine specs
With rope type rear main seals, i use a 3/4 drive socket layed on its side and hit it with your hammer working from the middle to the sides ensuring the rope is seated in the groove properly. soak seal in oil before hand. trim edges with a new razor blade to get a perfect cut. I also like to put a smear of 515 loctite across the surface where the cap bolts to the block to make sure no oil sneaks through there. If the flywheel bolts are drilled right through the crank into the oil side, make sure you apply some aviation 3 gasket goo to the threads of the flywheel bolts before installing or oil will leak out through the threads.
Please Log in to join the conversation.
13 years 6 months ago #35910
by fxs80
1939 D2
Replied by fxs80 on topic Re: Desperately needing Inter 282 engine specs
Cobba, I have a link to a copy of a service manual for a U.S. SBD282 (super black diamond sleeveless) if thats any good to you.
Cheers Gary
Cheers Gary
1939 D2
Please Log in to join the conversation.
13 years 6 months ago #35911
by cobba
Replied by cobba on topic Re: Desperately needing Inter 282 engine specs
Thanks to all that contributed.
I picked up the block and other bits on Friday afternoon and spent an enjoyable weekend cleaning, painting and assembling parts.
I took the easy way out and got the engine shop to assemble the short block for me. I could have done it myself but that's what they do for a crust and would (hopefully) get it right the first time.
I sent a far bit of time over the weeks preceding getting stuff to where I wanted it. First I got the head back after being dressed and tested and match ported it to the extractors I got.
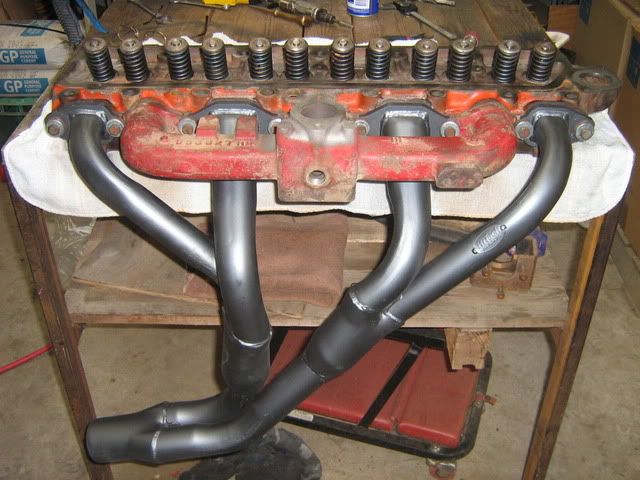
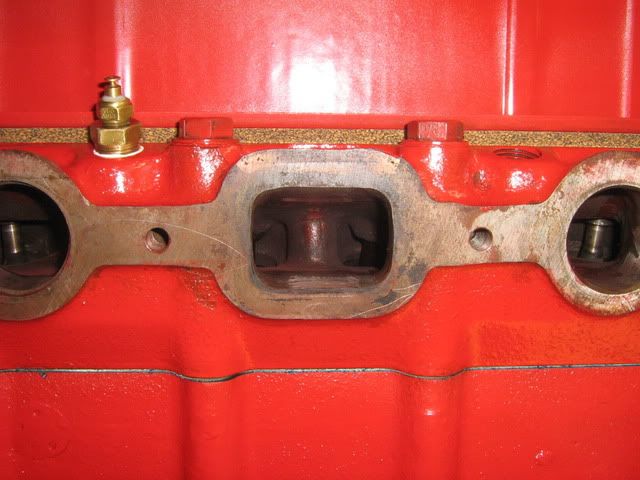
You can see the scribe line in this next shot where the gasket sits onto the head. It was a neat fit onto the extractors so I just took the head out to match that.

I took a fair whack of metal out of the exhaust ports. They went from about 30 x40mm to 38 x 51mm. The inlets only got a tidy up to remove any rough castings from the factory.
Bit by bit I got stuff together and fitted em up.
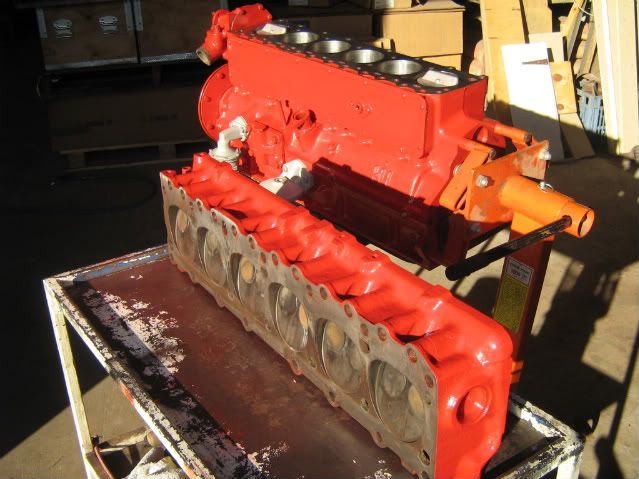
And finally it looked like this. Pity I didn't spot that dent in the rocker cover before I pianted it.
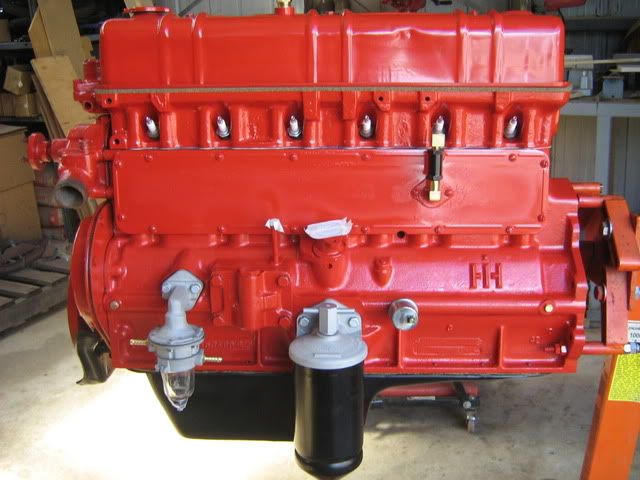
I still have a bit to do yet.
I have gone down a dark road with my choice of carbi. Finding a WW stromberg was becoming difficult and the carbi shops wanted to take my second born as a deposit to supply me with one ( not really but not far off it) so I opted to go for a 350 Holley with a WW adaptor plate.
I have added a heap of metal to the original manifold to make the base big enough to accept the WW stromy. It went from this.
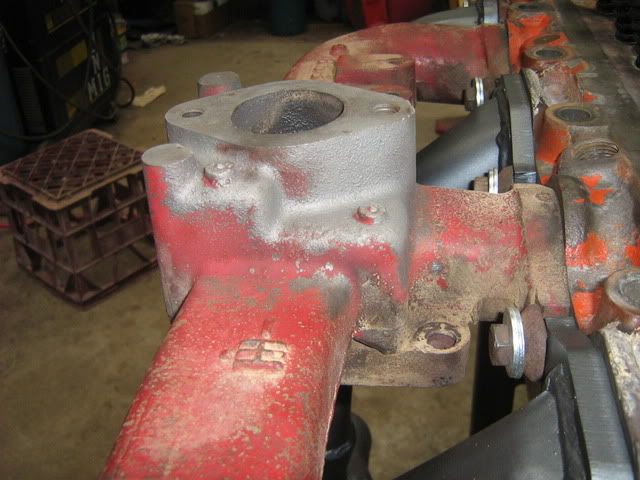
To this. actually, I have added another 10mm to the left and right sides since this shot was taken. I was only guessing on the sizes till I actually had a base plate to work with.
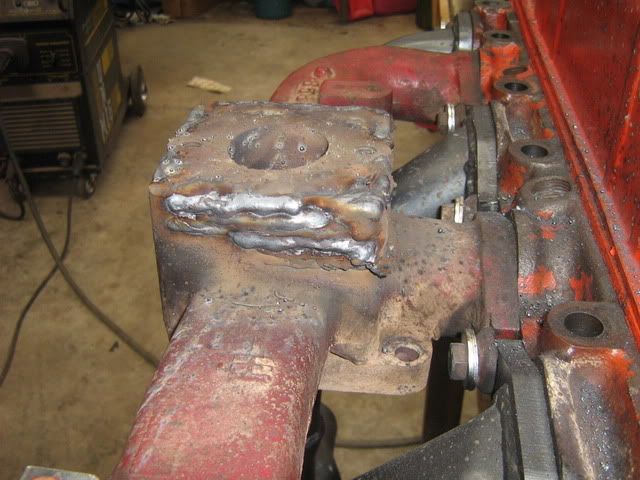
Carbi, aircleaner and base plate arrived in the post today and manifold it off to the machine shop first thing tomorrow morning to get a heap of metal chewed off it.

Will put up some pics when I get the manifold back and assembled onto the motor. Will be pretty close to putting it back in the truck by then.
Cheers. Cobba.
I picked up the block and other bits on Friday afternoon and spent an enjoyable weekend cleaning, painting and assembling parts.
I took the easy way out and got the engine shop to assemble the short block for me. I could have done it myself but that's what they do for a crust and would (hopefully) get it right the first time.
I sent a far bit of time over the weeks preceding getting stuff to where I wanted it. First I got the head back after being dressed and tested and match ported it to the extractors I got.
You can see the scribe line in this next shot where the gasket sits onto the head. It was a neat fit onto the extractors so I just took the head out to match that.
I took a fair whack of metal out of the exhaust ports. They went from about 30 x40mm to 38 x 51mm. The inlets only got a tidy up to remove any rough castings from the factory.
Bit by bit I got stuff together and fitted em up.
And finally it looked like this. Pity I didn't spot that dent in the rocker cover before I pianted it.
I still have a bit to do yet.
I have gone down a dark road with my choice of carbi. Finding a WW stromberg was becoming difficult and the carbi shops wanted to take my second born as a deposit to supply me with one ( not really but not far off it) so I opted to go for a 350 Holley with a WW adaptor plate.
I have added a heap of metal to the original manifold to make the base big enough to accept the WW stromy. It went from this.
To this. actually, I have added another 10mm to the left and right sides since this shot was taken. I was only guessing on the sizes till I actually had a base plate to work with.
Carbi, aircleaner and base plate arrived in the post today and manifold it off to the machine shop first thing tomorrow morning to get a heap of metal chewed off it.
Will put up some pics when I get the manifold back and assembled onto the motor. Will be pretty close to putting it back in the truck by then.
Cheers. Cobba.
Please Log in to join the conversation.
Time to create page: 0.512 seconds