- Posts: 3119
- Thank you received: 1745
A was for Austin, but now B is for Bedford
4 years 2 weeks ago #208798
by JOHN.K.
Replied by JOHN.K. on topic A was for Austin, but now B is for Bedford
Here s a did you know ...two mechanics starting trucks,landing vehicles and jeeps on a LST destroyed half the Pacific fleet ,and set back the Pacific war by six months.......One jam tin full of petrol did more damage than the Jap attack on Pearl Harbour..
Please Log in to join the conversation.
4 years 2 weeks ago #208805
by PDU
Replied by PDU on topic A was for Austin, but now B is for Bedford
No joy - smoke, but no bang :lol: other than a non committal back fire once in a while. 
Have decided to let it sit for a while as it isn't important at the moment - simply would have been nice to have it ready. I'll do another compression check later today, just to see if it has improved at all. Possibly also look at replacing the sloppy fitting rotor button, treat it to some new points and condensor, as the spark generated at the points looks really weak. :oops: ,
Meanwhile I'll go back to the real work on the truck like the two extra u-bolts for the axle, re-positioning the steering box, and making up some patch panels for the holes that need to be addressed on the cab..
The following user(s) said Thank You: cobbadog, Mrsmackpaul
Please Log in to join the conversation.
Less
More
- Posts: 6832
- Thank you received: 4768
4 years 2 weeks ago #208811
by Mrsmackpaul
Your better to die trying than live on your knees begging
Replied by Mrsmackpaul on topic A was for Austin, but now B is for Bedford
Johns methode is the first thing I would do followed by recking everying to make sure the timing with crank is still right
As in a bit of wire down the plug hole and watching the rockers to make sure all is as it should be, then the dizzy
Please diisregard if youve already done these steps
Paul
As in a bit of wire down the plug hole and watching the rockers to make sure all is as it should be, then the dizzy
Please diisregard if youve already done these steps
Paul
Your better to die trying than live on your knees begging
Please Log in to join the conversation.
4 years 2 weeks ago - 4 years 2 weeks ago #208814
by PDU
Replied by PDU on topic A was for Austin, but now B is for Bedford
Got it in one Paul, oiled (copiously) and checked number one firing using rockers and flywheel timing mark. Hung some rags over the side of the engine and cranked it over - spent the next half hour cleaning the wall of the house! :ohmy: :lol: Too copiously for the engine. :blush:
Put plugs back in and tried it - results as previously mentioned. Pulled plugs, cleaned with petrol, reinserted, tried again - same results. Trying distributor a few degrees after TDC, then a few more, then got a couple of backfires (hardly surprising). Eventually the whole process was running the battery down and I've put it onto the battery charger for another try later, maybe tomorrow?
No need to disregard, all comments are helpful, and supportive. It was the last thing I had decided to do on Monday and just goes to show, we're all basically on the same wave length.
Two large holes drilled that I had not been looking forward to, so something achieved for the day at least, and templates made for front left floor of cab.
Last edit: 4 years 2 weeks ago by PDU.
The following user(s) said Thank You: cobbadog
Please Log in to join the conversation.
4 years 2 weeks ago - 4 years 2 weeks ago #208817
by Lang
Replied by Lang on topic A was for Austin, but now B is for Bedford
Just from sad experience.
You should not be getting a backfire unless the timing is sadly wrong. If it fires near the right place it should give a "choof" and throw forward not bang out of the carby.
I know you have done it but check again.
1. Check again if Distributor is in the wrong way if it is a type that can be put in 180 degrees wrong. This is not a particular drama as all you need to do is march all the plug leads in order 180 degrees around in the cap which then stuffs up your plug lead lengths. But when it is in wrong it usually puts the side terminal in a difficult place beside the engine.
2. Check the rotor is pointing to number one lead with the engine at compression top dead centre (remember it goes around twice for each turn of the distributor) so you could be on your pulley timing mark on the exhaust stroke and the spark happening 180 degrees away from where it should be. Just put a finger in the plug hole as you or a helper turns the engine over to get the compression TDC. Or if the rocker cover is off, turn it to the timing mark position when both number one cylinder valves are closed,
3. Check the direction of distributor rotation and make sure plug leads are in the right order in the cap AND going to the right plugs.
4. Eliminate all the pain in the backside mystery faults by putting in new Coil, preferably new but at least clean and gapped points and specially condenser - the least considered but probably the most common problem child. You would have had an internal resistor coil originally but if you have grabbed a modern external resistor coil make sure you put in the resistor. It will run OK but burn your points pretty quick without it.
5. Run a hot wire to the coil to eliminate switch and dash wiring problems. In your case you are doing this already I presume.
4. Wash the distributor cap in petrol then with soapy water and toothbrush to eliminate unseen hairline crack carbon build up. This is not likely to be your problem but if you get missing once it is running.
Lang
Last edit: 4 years 2 weeks ago by Lang.
The following user(s) said Thank You: cobbadog
Please Log in to join the conversation.
4 years 2 weeks ago - 4 years 2 weeks ago #208841
by PDU
Replied by PDU on topic A was for Austin, but now B is for Bedford
Lang, thanks for your comment, I have covered all steps except step 6 (? :oops:).
Although I am frustrated by the lack of response from this engine, I must point out that I've done this many times with various engines over the years. Other than the pathetic compressions I have to eliminate obvious issues within the distributor - you'll notice my post from 12:14 that mentioned I am looking at points, etc.")
I was working on the premise that this engine was a runner previously . . . though I am fast beginning to doubt that? I have changed to a coil that I have used previously, and yes it is a resistor coil - without a resistor, as I was just aiming for the best spark (the points will take it for a while!) and you presume correctly it is on a live feed from the battery.
Unfortunately I am not able to obtain the parts I need easily, which adds to my frustration. Even more frustrating is the fact that I no longer have the O type distributor from the former engine. When I obtained this J series engine the seller had already 'sold' the distributor (but had not removed it at that time) and I said for him to leave it where it was and would give him my old one. Damn, NEVER let your "spares" go until you know you won't need them!
Stay with me, stay tuned, as I have said previously I appreciate the support and comments from all of you, and will get there eventually, I hope. :blink:
PS Well done by grandad, and your back up comment Lang, in the WotZit listing, that has been as trying as this engine almost. :lol:
Although I am frustrated by the lack of response from this engine, I must point out that I've done this many times with various engines over the years. Other than the pathetic compressions I have to eliminate obvious issues within the distributor - you'll notice my post from 12:14 that mentioned I am looking at points, etc.
I was working on the premise that this engine was a runner previously . . . though I am fast beginning to doubt that?
I have changed to a coil that I have used previously, and yes it is a resistor coil - without a resistor, as I was just aiming for the best spark (the points will take it for a while!) and you presume correctly it is on a live feed from the battery.Unfortunately I am not able to obtain the parts I need easily, which adds to my frustration. Even more frustrating is the fact that I no longer have the O type distributor from the former engine. When I obtained this J series engine the seller had already 'sold' the distributor (but had not removed it at that time) and I said for him to leave it where it was and would give him my old one. Damn, NEVER let your "spares" go until you know you won't need them!
Stay with me, stay tuned, as I have said previously I appreciate the support and comments from all of you, and will get there eventually, I hope. :blink:
PS Well done by grandad, and your back up comment Lang, in the WotZit listing, that has been as trying as this engine almost.
:lol:
Last edit: 4 years 2 weeks ago by PDU.
The following user(s) said Thank You: cobbadog
Please Log in to join the conversation.
4 years 2 weeks ago #208850
by PDU
Replied by PDU on topic A was for Austin, but now B is for Bedford
Not exactly rushing into things but while I was looking on the net for rotor button, points, condensor, etc, I saw this forum mentioned - notably a post from Laubsteven, May 2014, Bedford ignition issues! Help!
Interesting diagnosis in the comments, the coil again, plus he also mentioned the sloppy fitting rotor button that I have, hmmmm? We know where the root problem lies and I'll continue looking at sources for replacement parts after this comment is submitted.
The battle continues . . .
Interesting diagnosis in the comments, the coil again, plus he also mentioned the sloppy fitting rotor button that I have, hmmmm? We know where the root problem lies and I'll continue looking at sources for replacement parts after this comment is submitted.
The battle continues . . .
The following user(s) said Thank You: cobbadog
Please Log in to join the conversation.
4 years 1 week ago #208868
by PDU
Replied by PDU on topic A was for Austin, but now B is for Bedford
Cleaned the distributor thoroughly, opened the points up a bit, did the same with the plugs AND the tappets, just to make sure all valves have every chance of being closed. Did another check with compressions: 90, 70, 95!, 65, 50, 35 all improved, and not surprised at number six as this valve was the one rusted in the closed position - probably crying out to be refaced. :blush:
Threw caution to the wind with the Pacific fleet, tipped some petrol down the carburettor and actually got some signs of life! :ohmy: Repeated several times while varying timing slightly, then filled fuel bowl and managed a half-hearted run of about four or five seconds. Not startling, but showing signs of promise. Unfortunately I don't seem to be able to download the video my side kick Ernie took and messaged to my phone so cannot share it BUT it has fired at last . . . :woohoo: Did not persist at this point, we were satisfied with what we got.
Meanwhile the steering box has been trial mounted back on the original holes and looks reasonable. Only "reasonable" though as the cross link touches the rear u-bolts when almost on fiull lock (both ways of course - I must actually have things set up square and even!? :lol:).


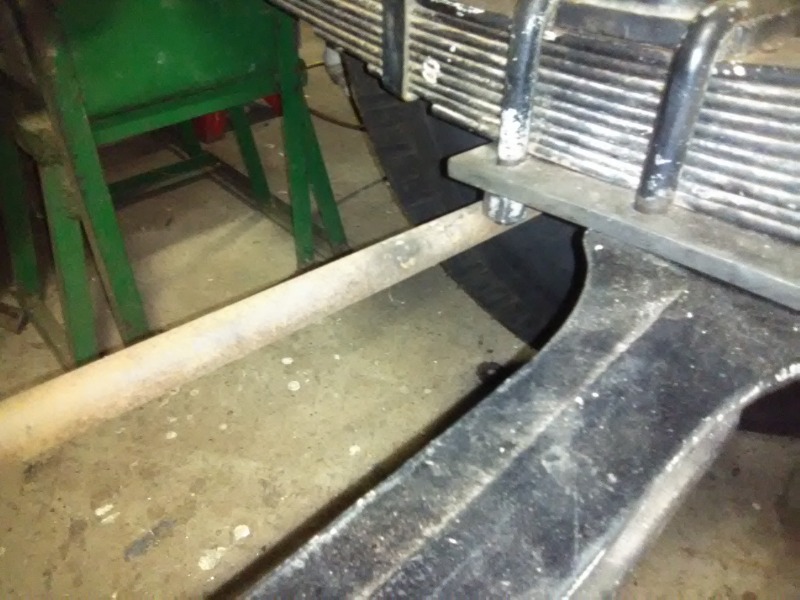
If I move the rear u-bolts to the front and use some nuts and bolts through a cross plate above the spring at the back the steering cross link should pass underneath the bolt heads and everything will be held firm. BONUS - no need to find two more u-bolts! Win-win solution.
all improved, and not surprised at number six as this valve was the one rusted in the closed position - probably crying out to be refaced. :blush:Threw caution to the wind with the Pacific fleet, tipped some petrol down the carburettor and actually got some signs of life! :ohmy: Repeated several times while varying timing slightly, then filled fuel bowl and managed a half-hearted run of about four or five seconds. Not startling, but showing signs of promise. Unfortunately I don't seem to be able to download the video my side kick Ernie took and messaged to my phone so cannot share it BUT it has fired at last . . . :woohoo: Did not persist at this point, we were satisfied with what we got.
Meanwhile the steering box has been trial mounted back on the original holes and looks reasonable.
Only "reasonable" though as the cross link touches the rear u-bolts when almost on fiull lock (both ways of course - I must actually have things set up square and even!? :lol:).If I move the rear u-bolts to the front and use some nuts and bolts through a cross plate above the spring at the back the steering cross link should pass underneath the bolt heads and everything will be held firm. BONUS - no need to find two more u-bolts! Win-win solution.
The following user(s) said Thank You: cobbadog
Please Log in to join the conversation.
4 years 1 week ago #208872
by hayseed
"Be who you are and say what you feel...
Because those that matter...
don't mind...
And those that mind....
don't matter." -
Replied by hayseed on topic A was for Austin, but now B is for Bedford
Glad you got some "smoke" out of the Old Girl..
As for the Tie rod.? Just do the "Farmer" repair & put a Bend (or 2) in It...LOL
As for the Tie rod.? Just do the "Farmer" repair & put a Bend (or 2) in It...LOL
"Be who you are and say what you feel...
Because those that matter...
don't mind...
And those that mind....
don't matter." -
The following user(s) said Thank You: cobbadog
Please Log in to join the conversation.
4 years 1 week ago #208878
by PDU
Replied by PDU on topic A was for Austin, but now B is for Bedford
Had thought about a drop link hayseed, and heaven forbid even a bit of heat on the steering arms!! :ohmy: :blink: But the nut and bolt idea is a strong possibility at the moment.
Smoke AND flame! Pacific fleet withdrew while I blew it out . . . :lol:
Smoke AND flame! Pacific fleet withdrew while I blew it out . . . :lol:
Please Log in to join the conversation.
Time to create page: 0.594 seconds