- Posts: 3878
- Thank you received: 2999
A was for Austin, but now B is for Bedford
3 years 7 months ago #215031
by cobbadog
Cheers Cobba & Cobbarette
Coopernook, The Centre of our Universe
Working on more play time.
Replied by cobbadog on topic A was for Austin, but now B is for Bedford
I think I know what you missed. Attaching the pivot hinges for the tilt cab.
Nice work, both with the gyprock and the cab
Nice work, both with the gyprock and the cab
Cheers Cobba & Cobbarette
Coopernook, The Centre of our Universe
Working on more play time.
Please Log in to join the conversation.
3 years 7 months ago - 3 years 7 months ago #215033
by PDU
Replied by PDU on topic A was for Austin, but now B is for Bedford
Nice try cobbadog, but you would notice the cunningly placed piece of tube, and obligatory spare piece of timber, under each side of the cab in picture three. These were to raise the cab high enough to slot the central cab mounting bolt through the appropriate hole in the cab. they worked as intended - conveniently being spat out onto the floor when the cab transitioned from rope to engine crane support.
As a clue to the oncoming issue . . . what has been changed in this saga?
PS Next report will come AFTER the issue has been rectified. :whistle:
As a clue to the oncoming issue . . . what has been changed in this saga?
PS Next report will come AFTER the issue has been rectified. :whistle:
Last edit: 3 years 7 months ago by PDU.
The following user(s) said Thank You: cobbadog
Please Log in to join the conversation.
3 years 7 months ago #215047
by PDU
Replied by PDU on topic A was for Austin, but now B is for Bedford
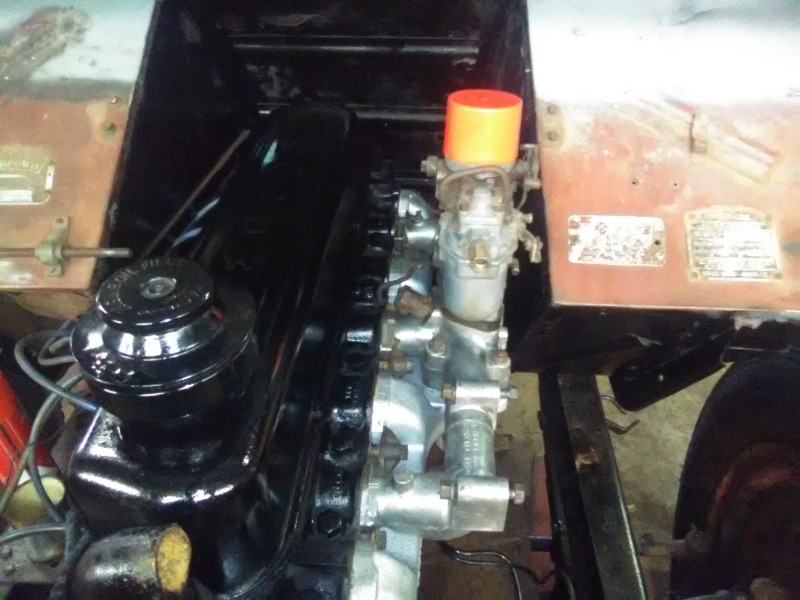
The engine and bell housing are different, obviously some changes occurred between 1951 and 1957 when the J Series was introduced. Notably a raised section in the bell housing just in front of the gearbox - this fouled the lower edge of the cab and requiring 5/8" to be removed to allow the cab to sit down onto the mounting pads.


ALSO the inlet manifold had a piece that stuck out sideways under the carburettor where a crankcase ventilator tube (?) is fitted, plus a plug (extending still further sideways). These fouled the passengers foot-well of the O type due to the engine setback.

After removing the section of cab above the casting hump (rather than change the bell housings! :pinch:) . . .

. . . and sawing off the offending piece of manifold, reinserting the plug , and then grinding it flush, approximately 1/8" clearance was achieved (whoopee! :blink:).

Barely sufficient for now, but will need further thought . . . possibly change to the O type inlet manifold with its odd angled carburettor mounting (that has the offending fitting on the opposite side of the carburettor") ) would give probably an inch of clearance. (Do they interchange???).
) would give probably an inch of clearance. (Do they interchange???).
With the two modifications made the cab sat perfectly onto the three mounting pads and everything snugged up nicely, including the conical springs, but now with nyloc nuts instead of castellated nuts and split pins.
Finally I was uncertain about the front engine mounting (also different between the J and O types) and consultation with my CD manual says it should be underneath the front cross-member, not on top. This seems odd, but did make sense after studying it for a while; consequently preliminary fitting did result in gaining some additional clearance for the distributor under the drivers side foot-well but better bolts and more nylocs will be needed.
It will be a pleasure to go to the Men's Shed tomorrow for a break!?!? :huh:
ALSO the inlet manifold had a piece that stuck out sideways under the carburettor where a crankcase ventilator tube (?) is fitted, plus a plug (extending still further sideways). These fouled the passengers foot-well of the O type due to the engine setback.
After removing the section of cab above the casting hump (rather than change the bell housings! :pinch:) . . .
. . . and sawing off the offending piece of manifold, reinserting the plug , and then grinding it flush, approximately 1/8" clearance was achieved (whoopee! :blink:).
Barely sufficient for now, but will need further thought . . . possibly change to the O type inlet manifold with its odd angled carburettor mounting (that has the offending fitting on the opposite side of the carburettor
) would give probably an inch of clearance. (Do they interchange???).With the two modifications made the cab sat perfectly onto the three mounting pads and everything snugged up nicely, including the conical springs, but now with nyloc nuts instead of castellated nuts and split pins.
Finally I was uncertain about the front engine mounting (also different between the J and O types) and consultation with my CD manual says it should be underneath the front cross-member, not on top. This seems odd, but did make sense after studying it for a while; consequently preliminary fitting did result in gaining some additional clearance for the distributor under the drivers side foot-well but better bolts and more nylocs will be needed.
It will be a pleasure to go to the Men's Shed tomorrow for a break!?!? :huh:
Please Log in to join the conversation.
3 years 6 months ago #215051
by mammoth
Replied by mammoth on topic A was for Austin, but now B is for Bedford
How much will the engine wriggle around on it's mounts? That 1/8" clearance may not be enough in which case is it possible to pack the cab up a little.
Doing well, keep at it.
Doing well, keep at it.
Please Log in to join the conversation.
3 years 6 months ago #215060
by PDU
Replied by PDU on topic A was for Austin, but now B is for Bedford
Very little movement engine wise mammoth, but I will improve the clearance later, hopefully by changing the manifold or by fitting a different engine entirely!?
Rome was not built in a day, and neither will my truck - my wife reckons I enjoy the journey more than the end product.
Rome was not built in a day, and neither will my truck - my wife reckons I enjoy the journey more than the end product.
The following user(s) said Thank You: cobbadog
Please Log in to join the conversation.
3 years 6 months ago - 3 years 6 months ago #215087
by PDU
Replied by PDU on topic A was for Austin, but now B is for Bedford
How's that mammoth? An inch of clearance now, manifolds do change, with a very small amount of misalignment in two ports (about 1'/32") which will hardly effect how it runs.
BUT using this manifold I need to use the original carburettor (which is no good) OR make an adaptor plate to accept the Humber carburettor.
BUT using this manifold I need to use the original carburettor (which is no good) OR make an adaptor plate to accept the Humber carburettor.
Last edit: 3 years 6 months ago by PDU.
Please Log in to join the conversation.
3 years 6 months ago #215103
by cobbadog
Cheers Cobba & Cobbarette
Coopernook, The Centre of our Universe
Working on more play time.
Replied by cobbadog on topic A was for Austin, but now B is for Bedford
That one gives you more clearance and that is a help.
Cheers Cobba & Cobbarette
Coopernook, The Centre of our Universe
Working on more play time.
Please Log in to join the conversation.
3 years 6 months ago - 3 years 6 months ago #215182
by PDU
Replied by PDU on topic A was for Austin, but now B is for Bedford
After seeing cobbadog's efforts for the day I'm feeling a wee bit slack with mine . . .
I did wire brush and clean down the engine to tidy things up a bit before doing a full blown rattle can rebuild :whistle: on the front and passenger's side of the engine at least!
The J Series mounting block was fitted above the cross-member . . .
 . . . and the crankcase venting tube to the inlet manifold was re-contoured, shortened, and flared, to suit the older inlet manifold. (picture isn't that clear but black on black doesn't make for easy piccies :blink:)

Maybe the sump and driver's side will get painted later???
I did wire brush and clean down the engine to tidy things up a bit before doing a full blown rattle can rebuild :whistle: on the front and passenger's side of the engine at least!
The J Series mounting block was fitted above the cross-member . . .
Maybe the sump and driver's side will get painted later???
Late note: Damn! I made an error in my second picture!!!
:blush:
Last edit: 3 years 6 months ago by PDU.
Please Log in to join the conversation.
3 years 6 months ago #215189
by cobbadog
Cheers Cobba & Cobbarette
Coopernook, The Centre of our Universe
Working on more play time.
Replied by cobbadog on topic A was for Austin, but now B is for Bedford
PDU, progress is progress no matter how much gets done. I kept getting side tracked by Dee and some of the wildlife that hang out here and some new ones too. I was just in cruise mode until poop hits the fan.
Cheers Cobba & Cobbarette
Coopernook, The Centre of our Universe
Working on more play time.
Please Log in to join the conversation.
3 years 6 months ago - 3 years 6 months ago #215275
by PDU
Replied by PDU on topic A was for Austin, but now B is for Bedford
Yep, slowly, slowly, catchee monkey cobbadog, I'm sure you know how it works by now? :lol:
Current side issue has been a desire to tidy up the appearance of the bulkhead - the object being too hide the back of the gauges, wiring, strengthening gussets, etc. Ignore angle iron in this picture, this was during earlier planning stages.

After much wandering of thoughts and several templates I worked out how it can be enclosed and end up with a boxed in section wherein can be concealed various bits and pieces such as a ducted heater and fan, electrics, and possibly a glovebox (oooooo wow! :ohmy:)
The templates were transferred onto some sheet metal and cut out . . .
Folded, split at the rear and folded again, then quicky screwed to front of cab to mark the top edge . . .

Trimmed and refitted . . .
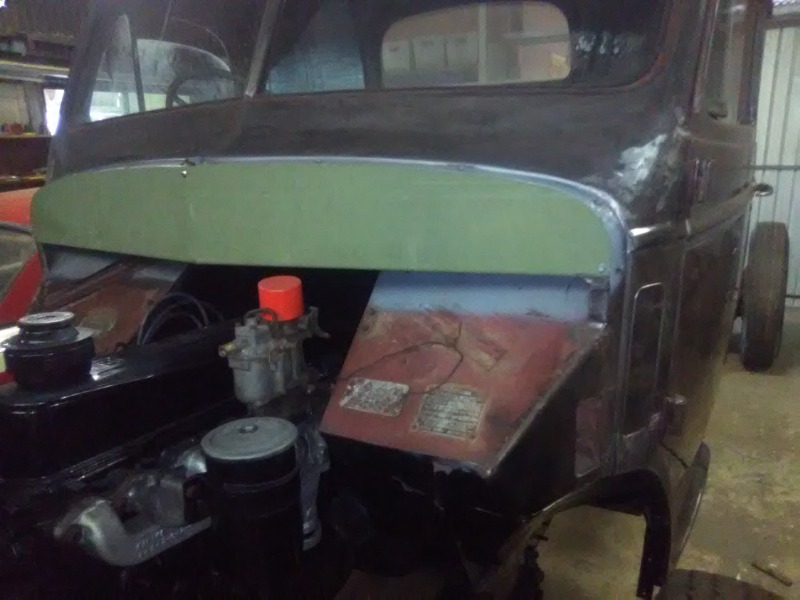
Which will do for now. Intention is to have a removable front section in the middle for access and leaving the original front nose panel/radiator stays as originally fitted (possibly). Much cleaner appearance.")
While taking the pictures above I noticed another casualty (probably) from the hit on the front right hand corner!?
Accelerator linkage support - replacement required.

Current side issue has been a desire to tidy up the appearance of the bulkhead - the object being too hide the back of the gauges, wiring, strengthening gussets, etc. Ignore angle iron in this picture, this was during earlier planning stages.
After much wandering of thoughts and several templates I worked out how it can be enclosed and end up with a boxed in section wherein can be concealed various bits and pieces such as a ducted heater and fan, electrics, and possibly a glovebox (oooooo wow! :ohmy:)
The templates were transferred onto some sheet metal and cut out . . .
Folded, split at the rear and folded again, then quicky screwed to front of cab to mark the top edge . . .
Trimmed and refitted . . .
Which will do for now. Intention is to have a removable front section in the middle for access and leaving the original front nose panel/radiator stays as originally fitted (possibly). Much cleaner appearance.
While taking the pictures above I noticed another casualty (probably) from the hit on the front right hand corner!?
Accelerator linkage support - replacement required.
Last edit: 3 years 6 months ago by PDU.
The following user(s) said Thank You: cobbadog
Please Log in to join the conversation.
Time to create page: 0.679 seconds